



How to Restore Damaged Woodwork
Damaged interior woodwork does not always need replacement. Chipped skirting boards, dented architraves, broken molding profiles, worn door frame edges, and damaged banister rails can all be rebuilt in place with the right filler. It's often quicker, cheaper, and less disruptive than ripping out and replacing timber. Here's how to harden, fill, and finish damaged interior woodwork to restore it to its original shape.
When can you repair rather than replace?
If the timber is still structurally sound and firmly fixed, a filler repair is usually the better option. This includes skirting boards with chipped or broken profiles, architraves with dented or worn edges, dado rails and picture rails with missing sections, door frames with localized damage from hinges, locks, or impact, and banister rails or newel posts with surface damage.
The substrate matters too. These repairs work on softwoods, hardwoods, and manufactured boards such as MDF, plywood, and chipboard, painted or unpainted. Bare softwood and cut MDF edges are porous and may need a second application of hardener; hardwoods and dense boards absorb less and take longer to dry before filling.
Interior woodwork damage is more often caused by impact, wear, and repeated decoration than by rot, though in kitchens, bathrooms, and ground-floor rooms, moisture damage is also common. If the timber has rotted through or the damage covers most of the section, replacement is often the right call. For localized damage, a filler repair saves time, cost, and the disruption of stripping out fitted woodwork. This guide covers repairs that are decorative and cosmetic in nature, not structural.
Step 1: Prep - remove damage and damage
Start by removing all loose, damaged, or soft material. Use a chisel, scraper, or multi-tool to cut back to solid, sound timber on all sides of the repair. On painted woodwork, remove any flaking or poorly bonded paint around the damaged area. The filler needs to adhere to timber, not to loose paint. Sand back any heavy build-up of old paint or varnish around the repair as well, so the filler can be feathered flush with the surrounding surface rather than sitting against a raised paint edge.
Brush out all dust and debris. The timber surfaces you're filling against need to be clean, dry, and sound.
Apply Wood Hardener to all exposed timber within the repair, using the brush supplied in the screw top lid. Work it liberally into the wood, paying particular attention to end grain and any areas where the timber is soft or rotten. It can be applied to dry or damp wood, but not soggy wood.
Allow to dry fully before filling.
The repair is now ready for decoration. Once the finishing coat is fully dry, it can be overcoated with any conventional paint, varnish, or stain. Check the overcoating time on the finishing filler you've used, since that's the surface the decoration goes onto rather than the repair filler underneath. Its low-odor formula makes it practical for use in occupied properties, so there's no need to vacate rooms or ventilate heavily during the repair. Once painted, a properly shaped and finished filler repair should be indistinguishable from the original timber.
Step 2: Fill - rebuild the shape
Wood Repair Filler is a powder filler formulated specifically for repairing, rebuilding, and restoring wood surfaces. It's available in two colors, white and natural wood , so choose which ever matches the surrounding timber or intended finish.
Mix the powder with water to a thick, workable consistency. There's no catalyst or hardener to deal with, just powder and water. A thicker mix gives you better control when rebuilding profiles, especially on vertical surfaces like skirting or architrave where a looser mix would slump. It has a 30-minute working time once mixed, so there's no rush.
Using a filling knife, apply the filler firmly into the repair, pressing it into the timber. Wood Repair Filler can be applied to any depth in a single application, with no need to build up in layers. Build the filler slightly proud of the final profile to allow for shaping and sanding back.
For shaped profiles like skirting moldings, architrave edges, or dado rails, let the filler firm up to a point where it can be worked, then shape it with a blade to match the surrounding profile. Use the undamaged sections on either side of the repair as your guide. For simpler flat or angled surfaces like door frame edges, build the filler flush with the surrounding timber and smooth it level with your filling knife, since it won't shrink back.
.jpg)
Step 3: Finish - smooth and refine the profile
Apply your chosen Toupret finishing filler, either go over again with Wood Repair Filler, Wood Filler or Fine Wood Filler, as a finishing coat over the repair. Either will smooth over surface imperfections, pinholes, or sanding marks left by the repair filler.
Apply a thin coat over the entire repaired area with a filling knife, feathering the edges out onto the surrounding timber so there's no visible line between the repair and the original woodwork.
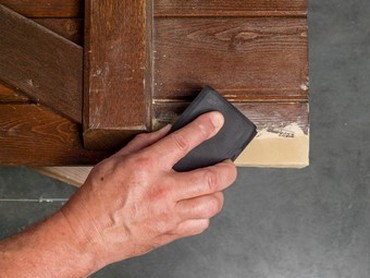
Allow to dry fully, then sand with fine-grit sandpaper (P180 or higher). Run your hand and eye along the profile to check it matches the surrounding woodwork.
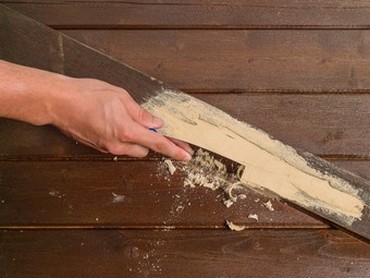
Once fully set, sand back to refine the shape. Start with a coarse grit to remove excess and define the profile, then work through to a medium grit. On curved or detailed moldings, wrap sandpaper around a shaped block or use a flexible sanding pad to follow the contour. The filler can also be drilled or screwed without crumbling.