



How to Repair and Reshape Damaged Masonry
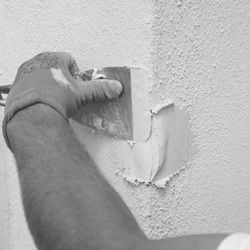
Damaged exterior masonry features don't always need replacing. Crumbling window sills, chipped cornerstones and damaged decorative mouldings can often be rebuilt in place using the right filler. It's quicker, more cost-effective, and far less disruptive than cutting out and replacing stonework or cast features.
With the correct preparation and repair products, you can restore damaged masonry back to its original profile and create a long-lasting finish ready for decoration.
When Can You Reshape Rather Than Replace?
If the masonry behind the damage is still structurally sound, a filler repair is usually the best solution. This includes:
- Window sills and coping stones with crumbling or frost-damaged edges
- Decorative mouldings and corbels with broken or missing sections
- Quoins, lintels and other architectural features with localised damage
- Rendered features such as string courses and window surrounds that have deteriorated over time
If the damage affects most of the feature, or the underlying masonry is no longer sound, replacement is generally the better option. However, for localised damage, even on detailed architectural profiles, repairing with filler can save substantial time, cost and disruption compared with sourcing and fitting replacement stone or cast elements.
Step 1: Prep - Remove Damage and Stabilise
Begin by removing all loose, crumbling or damaged material. Use a masonry chisel, scraper or multi-tool to cut back to solid masonry on all sides of the repair. The substrate you're building onto must be firm and stable, as any loose material left behind will compromise adhesion.
Brush away all dust and debris, then clean dirt, moss and algae from the surrounding area.
Before filling, test the substrate by rubbing your hand or a dark cloth across the surface. If dust transfers onto your hand or cloth, or if the surface crumbles under light pressure, the substrate is deteriorating and requires treatment. This is common on weathered masonry where the surface has broken down over time.
Apply Wall Hardener across the entire repair area, ensuring it penetrates the substrate thoroughly. Leave it to dry for at least 24 hours before proceeding with the repair.
Step 2: Fill - Rebuild the Shape
Select a filler suitable for the size and type of repair:
Masonry Repair Filler is designed specifically for rebuilding bare exterior masonry and can be cut and shaped easily after its initial set.
Tough Multi-Filler is a versatile option suitable for both filling and shaping.
Rock Solid Repair Filler provides a hard, extra-strong repair where maximum durability is required.
Using a filling knife or trowel, work the filler firmly into the repair area. Press it tightly against the prepared masonry to achieve strong adhesion and build it slightly proud of the finished profile to allow for shaping.
For detailed mouldings, corbels or decorative features, allow the filler to firm up until it can be worked without slumping. While it is still setting but firm enough to hold its shape, use a filling knife, scraper, trowel or suitable profiling tool to recreate the original detail, using the surrounding undamaged sections as a guide.
For simpler profiles such as flat window sills or square edges, smooth the filler flush with the surrounding surface using your filling knife or trowel.
Once the shape has been restored, allow the repair to dry fully before applying a suitable masonry paint or exterior coating.
At this stage the repair itself is complete. Let the filler dry fully, then overcoat it with a suitable masonry paint or coating.
Step 3: Premium Finish - Refine the Profile
For a premium-quality finish, take the repair one step further by blending it seamlessly into the surrounding masonry. On prominent or highly detailed features, this extra stage can make the difference between a visible repair and an invisible one.
Apply Tough Multi-Filler as a finishing coat over the repaired area. This helps eliminate minor surface imperfections, pinholes and marks left during the shaping process while creating a smooth, consistent finish.
Apply a thin coat across the repair and feather the edges onto the surrounding masonry so there is no visible transition between repaired and original surfaces.
Where the surrounding masonry has a textured finish, recreate that texture while the product is still setting to ensure the repair blends naturally into the existing profile.
Allow the surface to dry fully before decorating with a suitable masonry paint or coating. Once painted, a properly shaped and finished filler repair should be virtually indistinguishable from the original masonry feature.