


Why has my filler blistered?
There can be many reasons why filler blisters or bubbles, but the most common factor is the humidity problem. At least 95% of bubbling or blistering problems we see with fillers on substrates are due to humidity. But there can be other reasons. Read on for more.
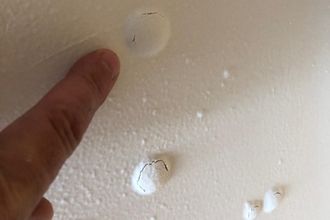
What is blistering?
Bubbles can form under the surface when products are applied to a substrate. This is what is known as bubbling or blistering and can occur when applying fillers as well as paints. It is sometimes necessary to make several passes over the filler to fully eliminate it .
It is not always possible to find out the source of the problem. It can be due to having too much water in the mix. Maybe the second coat was applied too quickly after the first. It can be frustrating not knowing exactly why those bubbles are appearing, but there are things you can do to minimise the risk of it happening on your job. As for ongoing issues when a filler blisters? It doesn’t affect the quality or performance of the filler and is mainly an aesthetic problem.
Humidity: major cause of filler blistering
Moisture is the most common cause of blistering. This can be caused, for example, by a problem of water penetration into the walls from outside. Water always needs to come out somewhere at some point and if that’s through the wall that you’re filling, this will likely cause the filler to blister on the surface.
Another possibility, linked to humidity, is painting or recoating too quickly after applying a filler to a surface. If the drying time isn’t followed, especially if the room temperature is suddenly increased, a reaction can occur: water trapped under the paint can turn into water vapor which expands under heat, increasing the risk of blistering. Always make sure the filler is fully dry!
Pay attention to preparation to avoid blisters.
The appearance of blisters can also be triggered by the process of applying the product and the type of surface being worked on:
- On new concrete: this type of surface has "micro-holes" inherent in the material, which are not always visible to the naked eye. It is important to fill them well from the start. Thorough and delicate application of filler is essential, so that the product penetrates well into these small cavities. This removes air and prevents that air in the hollows from being compressed and subsequently creating blisters in the filler.
- Renovating a previously painted surface: the layers of old material mean that the surface is impermeable it doesn’t absorb the water in the filler as it dries. So, the water has to find another way out as the filler dries and micro-capillaries can form on the surface of the filler - very small channels that are invisible to the naked eye – that allow the water to be displaced when the filler dries. It is a classic problem, particularly for ready mixed fillers that hold more water. If a second, thin layer of filler is then applied without raking well and therefore without filling these micro-capillaries, compressed air bubbles will form and cause the filler to blister.
How can I reduce the risk of my filler blistering? How can I get rid of blisters?
To avoid blisters as much as possible, especially on a non-porous surface that limits the ability of the water to evaporate, the best prevention is to rake the first coat well and apply a second, very thin layer.
Above all, it is important not to go too fast and respect the drying times!
Even if you follow all the guidelines, blistering can still happen. If this is the case, then the best remedy is to scrape the bubbles with a filling knife, then apply a second coat of very thin, tight filler.